Showing posts with label card. Show all posts

Friday, 24 January 2014

As You See It Challenge #021 (Sweet Baby)


I've been having lots of fun playing with my new stamps from the 2014 Occasions Catalogue. What's on your "must have list" of new products??

As soon as I saw the cute images in Baby, We've Grown, I knew it needed to be added to my collection. Those cute grumpy owls (they're not meant to look grumpy, but they kind of do!) and that adorable little bunny were destined to be brought to life. 

This weeks' As You See It Challenge features a focal point right smack in the middle. I thought it was the perfect opportunity to break out some new rubber!

Here's the sketch that the lovely Amanda has designed:


Lots of fun! I have to admit, I didn't adhere to the shapes of the challenge, but the general idea is definitely the same.  I don't have all of my supplies with me so I had to just use what I have and this is what I came up with:

I didn't have a scallop square or rectangle so I went with the Deco Labels Framelits.  I had been antsy to use the new Arrow TIEF (textured impressions embossing folder) so I broke that out for the background of that. It's cut out and embossed on Smoky Slate card stock.  I then used the Circle Framelits to cut out that circle of DSP from the Fresh Prints paper stack. Love the fun and sassy designs in that super stack of paper!


I also used the new Fringe Scissors for the first time, too! I've seen some really cute cards using them on Pinterest so I'll hopefully be making lots of fringe-filled cards! The three red candy dots are in place of the sentiment on the sketch. I've been quite taken with Real Red and Coastal Cabana paired together. I'm not normally a red person, so I find this kind of odd, but fresh and new at the same time!

Now comes the best part!  Look at that rabbit! Isn't he the cutest??? I've fallen in love with him! I stamped him in Jet Black StazOn ink and then coloured him in with an aquapainter and Basic Gray and Coastal Cabana ink.  I went around the outline very lightly with crumb cake to create a bit of dimension. Then I added some beneath as well to ground the images. 


He even looks kind of fuzzy. I want to pluck him off the card and give him a good cuddle!


Here's a last look at the completed card.  what's your favorite addition? The candy dots? The fringe? Mr. Rabbit?  I'd love to hear your comments!

Enjoy and be inspired!

Tamara

Friday, 3 January 2014

As You See It Challenge #018 (playing with the NEW!!!)


I've been MIA over the holidays, but I'm happy to report I'm getting back in the saddle.  I spent some time in my studio last night working on today's post and some customer thank you's.

Here is this week's challenge: ARROWS! And I'd be remiss if I didn't share the cute graphic Amanda created!

http://www.asyouseeitchallenge.com/wp-content/uploads/2013/11/AYSIChallenge018.jpg
I subconsciously used the colours as well, though that wasn't intended. I mostly just wanted to use some new product and the Fresh Prints DSP stack has Real Red, Coastal Cabana, Crumb Cake, and Whisper White.

Here's my entry:
I know the arrow is subtle, which is what I was hoping to achieve. I had been flipping through this year's Sale-a-bration brochure (yes!! I have them!!) and saw a cute card with polka dots. I achieved the polka dots with a sponge dauber and ink pad.  I freehanded an arrow and then cut it out with an exacto knife and used that image as a mask. I then lightly sponged crumb cake over top to enhance the arrow shape.  

Some cute pennants finished off with Whisper White Baker's Twine. Loving these colours together, aren't you?

One last view. I used my iPad to take these photos. My laptop had an unfortunate mishap over Christmas. My darling daughter (2.5) decided to dump a full cup of eggnog on it! It hissed and popped and died. It will turn on now, but the keys are glued together and I haven't had the patience to carefully and gently work each key loose. I've been in the market for a new one for a while, but this will most likely speed up that process!

Anyways, I hope you leave feeling inspired to play with arrows! Have a look through the Stampin' Up Annual catalogue for inspiration. Can you find any projects featuring arrows there?

Have a great weekend!

Tamara

Friday, 6 December 2013

My Christmas Tree & AYSI Challenge #014


It's definitely getting Christmasy around here! I put up our tree today. Actually, I bought a new "slim" tree and decorated it before my husband got home so it would be harder for him to say "return it". He likes it so it gets to stay! Also helps that it was pretty cheap and I used a gift card for part of it ;) Here's a little pic. It's not quite done, I'm missing a ton of decorations, but it's getting there! It fits our space a lot better, which was the main reason for getting it. We have a beautiful HUGE fake tree, but it's HUGE! (In case you missed that).


I know you didn't come here to see photos of my Christmas tree though, so here's this week's As You See It sketch challenge:
 
And my Design Team entry is decidedly NOT Christmas themed. I needed a change. 

 I had fun making this while my friends slaved away making their Stamper's Dozen cards.  It's fairly simple, but enough bling and added touches to make it special :)

Here are some alternate views:

And a close up:
The colours are Coastal Cabana, Smoky Slate, and Crushed Curry. I used the Chevron embossing folder (TIEF) on the card base. Chalk Talk framelits provided the cute little tag. I used some Coastal Cabana stretch ruffle trim for the tails and rhinestones to bling up the sentiment which is from Yippee-Skippee! (LOVE that set. Wish I could use it on everything!) I'm trying to remember the name of the DSP, but it's just not coming to me. It's the primarily gray, yellow, and blue one. It goes with the Beautifully Baroque stamp...I think it's something about Eastern...Eastern Elegance DSP maybe? Leave me a comment if you remember the name of this paper stack!! Thanks :)

Hope you're feeling inspired! Be sure to visit the other Design Team's pages for more inspiration!

Tamara
Friday, 8 November 2013

Zing! As You See It Challenge #010

Pa-chow! Zing! Did you hear that? Another week has FLOWN by and it's time for Challenge #010 at As You See It Challenge!

I'm having sooo much fun doing these weekly challenges. Sometimes I'm amazed at what I come up with. Like this week. I was having a really hard time and stuck in a rut. I really wanted to use washi tape and I struggled and struggled. Then I just ditched the washi tape and went another direction and I.seriously.love.it!

Here's the sketch before I get too far ahead of myself:
                                     

And here is my baby:

Once I got going, it came together pretty quick! I did have to reference the sketch about a bazillion times, but I'm really pleased with the outcome. 

I took a ton of pictures so bear with me...(side note, I think it's funny when people write "bare with me". I'm like, um, no, I'm not going to be bare with you...) Get back on track!

Here are some alternate views:
 That little strip holding the pearls? Yep, arrow of death. It was like getting a bad haircut. A little here, a little there. That's too long, not that side looks funny. It started out about 5 inches and now it's only 2.5. Sigh.


 Frosted Finishes are gorgeous!  Typically I would hoard these precious gems but HOARD NO MORE! We used them at my last technique night and this was the last one in the container! Gotta order more!

And, before we move on, I have to give a shout out to the Champagne Glitter Paper! That MAKES this card to me. 


 Also digging the Positively  Chevron background stamp. I inked it in Sahara Sand and stamped off once before stamping it on the Whisper White Panel. The Joyful Tidings is from Christmas Messages. It's stamped in Cherry Cobbler.


  There was still a lot of white space on the panel, so I decided to put the normally "inside" greeting on the outside. I lurve it. A lot. 

Put it all together and you have one stunning Christmas Card! Here's one last look so you don't get RSI (repetitive scrolling injury). 

Don't forget to join the fun at As You See It Challenge!

'Til L8tr (remember when people did that? Ugh!)

~Tamara


Friday, 11 October 2013

AYSI Challenge #006 - Antiquified

Really? Already? Another week has flown by (possibly because I've been sick with a nasty head cold for most of it) and it's time for another As You See It Challenge!

This week is another sketch! I made this card back in August (yes, us DT members are given a few weeks sketches in advance ;) so I've been waiting to share! 

First up, the sketch:


At Stampin' Up! Convention this past July, Pam Morgan, a SU employee, shared something pretty neat that I'd never thought of before. I'd seen it done in DIY but not in stamping. What am I talking about? Gilding of course! To be fair, this is a bit more than gilding ('cuz I think that's mainly when you just dip or do the edges) this is more like half submersion gilding.  I guess it would help if I showed you my card ;)

Here she be:


I had planned to give this card to my sister-in-law for her birthday back in September, but Melon Mambo (hot pink)  just isn't her. I could really use some purple embossing powder!

I really love everything about this card. It came together really quick, which is always a plus! The DSP is from Modern Medley...a must have. This paper is so versatile with it's feminine and masculine and plain stripe/dot prints. *word to the wise (unwise?). When I ordered this paper, I thought it was black and white. Turns out it's black and vanilla-now we're all wised up.)

Mmm mmm! Nothing says, "hello" like hello in Melon Mambo embossing powder! How fun is that?!? Even one friend who came to class who admittedly does not like this stamp, liked it after embossing it! It also ties in nicely with those....


 butterflies! I used both the Bitty Butterfly and the Elegant Butterfly punches and stuck on a few rhinestones. The largest b-fly is a black one first, then a Melon Mambo one on top with the wings gently folded to make it look like it's flying (or stuck to the card and trying to fly away).  

Let's talk about the doily.  It's a Stampin' Up! paper doily. I have a few packages of doilies. They are all "white" but one package is somewhere between white and vanilla. Remember above where we all got our wisdom on about the Modern Medley DSP being basic black and very vanilla? Well, the doily isn't quite very vanilla, but it's definitely NOT Whisper White! It's white anitiquified (is that a word?). It's not really a big deal as we embossed most of it anyways. To achieve this look:

1. Make sure you have just one doily (they like to stick together)
2. Apply versamark over half of the doily. Try not to have the straight edges of the pad. Blend a little.
3. Pour your embossing powder on in your choice of colour (I used silver here). 
4. Dump off excess (preferably back into the container to save the sacred powder and avoid it from getting blown away in step 5).
5. Heat set.
6. Admire your handiwork and give yourself a pat on the back. You just gilded something.

Here's one last look at today's creation:


 Hope you enjoyed today's card and easy peasy tutorial! Be sure to check back in often and PLAY WITH US at As You See It Challenge!

That's all for now!

Tamara

Stampin' Supplies:
Card Stock: Basic Black, Melon Mambo, Modern Medley DSP
Stamp Set: Four You
Ink: Versamark
Accessories: Melon Mambo EP, Basic Rhinestones, Paper Doily, Silver EP
Tools: Bitty Butterfly Punch, Elegant Butterfly punch, Heat Tool


Friday, 20 September 2013

AYSI Challenge #003

It's a little hard for me to believe that it's our third As You See It Challenge already!  We were SO happy that with how many of you participated in the first ever challenge!! Keep those cards coming! This week's sketch is a lot of fun and I think this may be my favourite card yet!

This is the week's sketch: 
 

Fun, hey? 

Here's a peek:
 I like classy and elegant and this is just that! Basic Black and Very Vanilla are always in style, and the pop of Crisp Cantaloupe takes it up a notch! 


 I heat embossed the Beautifully Baroque flourish with Black embossing powder. It's prettier in person as there's a shine off of the image which makes it stand out from the rest of the card.

Hoping to inspire!

Tamara

Stampin' Supplies:
Stamp Sets: Teeny Tiny Wishes, Beautifull Baroque
Card Stock: Basic Black, Very Vanilla, Modern Medley DSP, Crisp Cantaloupe
Ink: Jet Black StazOn, Versamark
Tools: Big Shot Die Cutting Machine, Corner Rounder punch, Top Note Bigz Die, Heat Tool, Paper Snips
Accessories: Black EP, Large Rhinestone

Tuesday, 3 September 2013

Serene Silhouettes

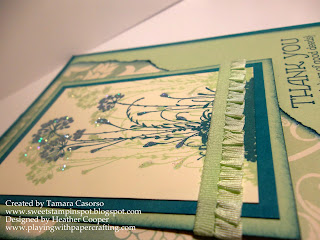
Today's card was designed by one of my team members, Heather Cooper. Heather has a GREAT blog at www.playingwithpapercrafting.com.  I continue to be amazed at how quickly she has accomplished in regards to her Stampin' Up! business. Her classes are booming (which is really no surprise since her projects are AWESOME!).  At last month's team meeting, Heather offered to do make-and-takes for us. This is one of her designs and I am LOVING these colours paired together! Have a look:
I don't know if I would've paired Pistachio Pudding with Island Indigo, but I love how they look together! 

Here's another angle:
It's kinda noticeable in this photo, but we went over the flowers with the 2 way glue pen and then added some Dazzling Diamonds glitter to give it that pretty sparkle! 

The edges were sponged with Island Indigo for a bit of contrast.

Thank you Heather for continuously sharing your gorgeous projects with us!!

~ Tamara

Stampin' Supplies:
Serene Silhouettes
132073 Serene Silhouettes 
Lots of Thanks
129690 Lots of Thanks

Venetian Romance Designer Series Paper
130144 Venetian Romance DSP

Pistachio Pudding 3/8" Ruffle Stretch Trim
130020 Pistachio Pudding Stretch Trim Ribbon
Stamping Sponges
101610 Stampin' Sponges
Island Indigo Classic Stampin' Pad
126986 Island Indigo Classic Ink
Pistachio Pudding Classic Stampin' Pad
131177 Pistachio Pudding Classic ink
Dazzling Diamonds Stampin' Glitter
102023 Dazzling Diamonds glitter
2-Way Glue Pen
100425 2-way glue pen

Thursday, 8 August 2013

Happy Birthday, Baby!

I made this sweet card for the newest addition in a very close friend's family! Little Hayden was born in May (showing how long my camera cord was lost since I hadn't uploaded these photos!). I wanted the card to be boyish, but still cute and soft. I think I achieved that this go.


 What do you think? It's So Saffron, Pool Party, and Basic Gray. It was a fun colour combo to work with.  Hayden was not quite 10 days old when I met him, so I thought it was appropriate enough that I could still say Happy Birth-day! I got some snuggle time in and visited with his sweet momma. It's so good to have friends who know what it's like having toddlers at home! It's easy to feel very overwhelemed at times, but I know I have a good circle of other moms going through the same struggles. It's nice to know I'm not alone.  That's partly why I love stamping and papercrafting so much. It's a way for me to BE ME. Having young kids means doing a lot for everyone else, except yourself. Through my stamping, I've been able to escape and have "me time" almost every day. I've also met a lot of great friends (and babysitters) through stamping, which is a huge positive!

Anyways, I got a little sidetracked.

I hope you like little Hayden's first birthday card!

Tamara

Stampin' Supplies:
Stamp Set: Patterned Occasions (SAB), That's the Ticket
Card Stock: Basic Gray, So Saffron, Pool Party
Ink: Pool Party, So Saffron, Basic Gray classic Ink, Basic Gray stampin' write marker
Accessories: Pool Party Ruffled Ribbon, Stampin' Dimensionals
Tools: Big Shot die cutting machine, Polka Dot TIEF, 2 1/2" Circle punch, Ticket Duo Punch