Monday 26 August 2013

Stamp Studio Reveal -Part I

Here's the first segment of my Studio reveal! I've tweaked the set up of the room a bit since these photos were taken so I'm just giving you glimpses of what it looks like. I have a class this Wednesday so I will take some photos of the room when it's clean and ready for fun!

Welcome! I'm in the process of making a cool vine wreath for the front door. 


 This hutch and cabinet is from a sweet stamping friend who passed away last year. It's so nice to have a memory of her in my studio. My mom-in-law helped me sand it and paint it white. I gave the back a pop of colour with some Benjamin Moore Tropicana Cabana! The wall colour is also BM - Jamaican Aqua. It's kind of a mix between Pool Party and Coastal Cabana.


Hopefully in the near future (when it's not so hot) I'll serve tea at my classes! I picked up this sweet and complete china set from a couple who were downsizing. I love that the colours of the tea set went with my room!  

That's all the peeks for now! I'll take some more photos as I've added blinds and a few other things since these photos were taken.

Hope you've enjoyed the first glimpse ;)

Tamara

Saturday 24 August 2013

Butterfly Happiness

I'm ashamed to admit to you all that there is a room in my house that has barely seen me in all week. Don't worry, it's not the bathroom. I have showered and looked after myself. It's my stamp room.  For some reason, I just haven't gone out there.  So instead, I've been pretty hooked on Pinterest lately (and the Despicable Me minion app but keep that hush hush, ok?)  I now officially have WAY too many cards pinned and nothing to show for it. I decided to change that by making this little beauty: 

It's CASEd from Teneale Williams. I had pinned this off Pinterest thinking it would be great for a quick and cute class so I simplified it a tad by not sponging anything. I still like the original better, but this one is a close second. 

The butterfly is stamped in Jet Black StazOn ink and then I used a blender pen to colour it in using the lid of the Crisp Cantaloupe ink pad. I let it dry briefly and added another layer of CC ink to intensify it. 

The "happiness" stamp is from a word set called Fabulous Phrases. It's great as there are lots of words and you can use them separately or create, well, phrases. 

Here's the complete list of products:

Stamps: Beautifully Baroque, Papillion Potpourri, Fabulous Phrases
Card Stock: Crisp Cantaloupe, Very Vanilla, Crumb Cake, Modern Medley DSP
Ink: Crisp Cantaloupe, Jet Black StazOn
Accessories: Crisp Cantaloupe Ruffled Stretch Trim
Tools: 1 3/4" circle punch, Elegant Butterfly punch, Blender pen, paper snips

Hope you've got a fun weekend planned! If it's rainy, CASE something from Pinterest. It's a great way to get out of a stamping slump!

~Tamara


Monday 19 August 2013

Cake & Splatter

Sometimes I find the hardest part of writing a blog post is coming up with a catchy title. I want to attract readers' attention by snagging their curiosity. Did it work with you? What did you anticipate finding in this post? A food fight? 

It's a super fun card. I CASE'd it from my upline, Desiree Spenst. I changed it up (as usual) to fit the products I had on hand. In this case, everything revolved around what colour reinkers I had and a coordinating ribbon.

 Here's the card. See all those splotches on the whisper white panel? That's the splatter.  

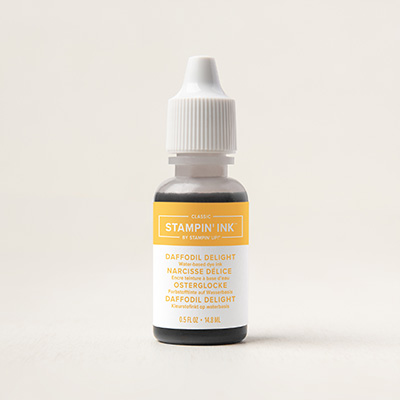
The colours I've used for this card are Pool Party, Midnight Muse, Daffodil Delight, and Whisper White.  It's difficult to see, but the Whisper White panel is embossed with the Modern Mosaic TIEF and then using Stampin' Spritzer's filled with rubbing alcohol and about 20 drops of reinker, I opened it up and just let the drops fall.  This is not spritzing with the spritzer. That would give a completely different look. I had three spritzers (one for each colour).  The great thing about using alcohol is that it dries so quickly.  After I had my desired level of splatter acheived, I moved on to embossing that yummy slice of cake. 

Scrumptious! I stamped the image (from Make a Wish) in Versamark and then used Silver Embossing powder and then heat set it. After that, I just punched it out with the 2.5" circle punch (definitely a fav of mine). It's popped up on a few glue dots...dimensionals! (Just making sure you're following along ;) 

I used the Scallop border punch on the thin midnight muse panel and wrapped a piece of the stitched grosgrain ribbon in Daffodil Delight with a faux bow.  

This is a great card for any age, any gender. It'd be good to keep some of this in stock.  Have a look at the products below to see what you need. I even included the item number so if you're placing an order, it's easy peasy. (Just remember to go to my Online Store to have your order shipped right to you! Or, if you're in the Kelowna area, email me your order to save a bit on shipping -for orders under $100). 

Go have some cake while you make a card!

Tamara

Stampin' Supplies:


Sketched Birthday
Sketched Birthday 130423

Modern Mosaic Textured Impressions Embossing Folder
Modern Mosaic TIEF 129984

Scallop Edge Border Punch
Scallop Edge Border Punch 119882
2-1/2 Inch Circle Punch
2.5" Circle Punch 120906
Daffodil Delight 1/4" Stitched Grosgrain Ribbon
Daffodil Delight Stitched Grosgrain Ribbon 126872
Stampin' Spritzer
Stampin' Spritzers 126185
Daffodil Delight Classic Stampin Ink Refill
Daffodil Delight reinker 119672

Saturday 17 August 2013

The Building Phase

On a beautiful sunny day, the walls started going up! Some time has elapsed (as you can see by the flowers and leaves peeking through on the pear trees in the background).  Winter finally left (it needed a good swift kick) and spring is springing! I think our family of 4 was just headed out for a bike ride up at the KVR Trestles in Myra Canyon - it's SO beautiful! 

Just as we were getting ready to leave, the crew asked JP to help them raise a wall. 

Check out those studs! (The human stud is my husband!)


He's holding the future window section here. This window will look into our yard, towards our door. It's nice as I can look outside to see what the kids are doing ;)

Once the frame was done, the roof went on. I don't think I've EVER been so excited about a roof. It started to really resemble a building which was pretty exciting in my books!
The roof is a nice grayish tone.  The ceilings inside are 9ft (I think - maybe 10) so it feels roomy.  They'd started to put the plywood on the sides and once that was complete, it was on to the insulating! We hired out for this as it's a yucky job. 

It's also not overly exciting to take photos of, so this is it. One lone photo. The room is stuffed and wrapped and ready for drywall! I didn't take any photos of the rest of the process. A lot of the next steps happened while I was at work so I didn't have a chance.  I guess I'll just have to show the after photos....next time!

Be sure to check back to see the finished room! Eek! I can't wait to show you!!

Hope you're enjoying the reveal!

Tamara

P.S. Be sure to check out the new challenge blog - As You See It Challenge and LIKE us on Facebook!


Thursday 15 August 2013

Thank You!

Today I'm sharing a card that was featured on a brand new Challenge Blog that I'm going to be participating in as a designer! You can expect more frequent posts and new projects weekly!! Head over to As You See It Challenge  to check out our design team and "Like" us on Facebook - As You See It Challenge Facebook. Be sure to check the site out today as I've done a short Q&A to introduce myself :)


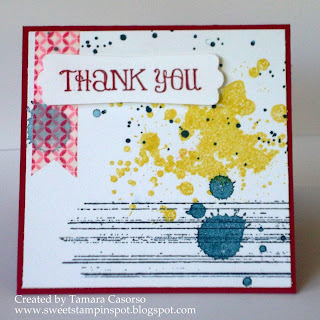
These little 3x3's were my customer Thank You's for the month of July.  
  • I used Gorgeous Grunge, one of the free Convention sets, to create a fun background. I love all the various ink splatters.  
  • A flag of washi tape adorns on edge. I like how it's translucent revealing an ink splatter beneath.  
  •  Lots of Thanks, a fun sentiment set featuring all combinations of saying Thank You. This one has a bit of whimsy with it's font.  

  • I used the Modern Label punch to give some definition and a dimensional for some lift.

Thanks for stopping in!

 Supplies Used:
Gorgeous Grunge
Gorgeous Grunge 130514

Lots of Thanks
Lots of Thanks 129687
Raspberry Ripple 8-1/2" X 11" Card Stock
Raspberry Ripple Card Stock 126842
Gingham Garden Designer Washi Tape
Garden Gingham Washi Tape 129314
Modern Label Punch
Modern Label Punch 119849


Thursday 8 August 2013

Happy Birthday, Baby!

I made this sweet card for the newest addition in a very close friend's family! Little Hayden was born in May (showing how long my camera cord was lost since I hadn't uploaded these photos!). I wanted the card to be boyish, but still cute and soft. I think I achieved that this go.


 What do you think? It's So Saffron, Pool Party, and Basic Gray. It was a fun colour combo to work with.  Hayden was not quite 10 days old when I met him, so I thought it was appropriate enough that I could still say Happy Birth-day! I got some snuggle time in and visited with his sweet momma. It's so good to have friends who know what it's like having toddlers at home! It's easy to feel very overwhelemed at times, but I know I have a good circle of other moms going through the same struggles. It's nice to know I'm not alone.  That's partly why I love stamping and papercrafting so much. It's a way for me to BE ME. Having young kids means doing a lot for everyone else, except yourself. Through my stamping, I've been able to escape and have "me time" almost every day. I've also met a lot of great friends (and babysitters) through stamping, which is a huge positive!

Anyways, I got a little sidetracked.

I hope you like little Hayden's first birthday card!

Tamara

Stampin' Supplies:
Stamp Set: Patterned Occasions (SAB), That's the Ticket
Card Stock: Basic Gray, So Saffron, Pool Party
Ink: Pool Party, So Saffron, Basic Gray classic Ink, Basic Gray stampin' write marker
Accessories: Pool Party Ruffled Ribbon, Stampin' Dimensionals
Tools: Big Shot die cutting machine, Polka Dot TIEF, 2 1/2" Circle punch, Ticket Duo Punch

Tuesday 6 August 2013

Happy Dirtday!

I made these cards a REALLY long time ago, but then I misplaced the cable for my camera and couldn't upload any photos. We did a big rearrange of rooms in our house recently and my camera cord reappeared! It's too bad that now basically all of the stamps and papers I used are now retired! I thought you might enjoy seeing them anyways. You can always subsitute a stamp set you do have along with Designer Series Paper you have on hand. (If you don't have ANY, please shop with me at my online store).

This is still one of my all time favorite boy stamp sets! It wasn't for sale at my Rubber Rummage sale and I'm not sure I'll ever part with it. Even when my little boy grows up, it'll be something I use for years to come! I used markers to colour in the stamps and then did some paper piecing by snipping out the bucket part of the dump truck and then popping it up with a dimensional. 

Parker's Patterns Designer Series Paper was a great package of paper for creating masculine cards. Even the yellow chevron pattern has a rugged look to it. 

Here's bascially the same card just a different orientation:
Enjoy your day and thanks for stopping in!

Tamara

Stampin' Supplies:
Stamp Set: I Dig You
Ink: Marina Mist, Early Espresso, Cajun Craze, Daffodil Delight Stampin' Write Markers
Card Stock: Marina Mist, Cajun Craze, Early Espresso, Whisper White, Parker's Patterns DSP
Other: Stampin Sponge & Early Espresso classic ink, dimensionals
 

Monday 5 August 2013

Demolition

Most of you probably know already that we recently built a new structure at our place. We had an old, old building that we used mostly for storage. It wasn't well insulated, had concrete floors, and had a few unwelcome inhabitants. Here's the outside of the builidng:
It was in sad shape. The roof was starting to cave in and it just wasn't that functional for us. We did a fairly big clean up and either donated or trashed a bunch of stuff. The rest was organized and put into a Big Steel Box for the time being (meaning until we move somewhere bigger). 

Demo day was April12th (I think). The kids were pretty excited to watch and now Mason wants to destroy buildings when he gets bigger.


Down it came! It only took about 15 mintues for to get the majority of the building down and into the bin. Then it was cleaning up all the smaller chunks of debris.
Stay tuned for another post with the framing and construction!

Tamara